Around this time last year I wanted a spooky adventure I could run as a one-shot for Halloween. The optional introductory adventure from Curse of Strahd, Death House, seemed like it might be perfect. I started googling to find advice on running it and one thing became clear: the consensus seemed to be that it doesn’t make for a good one-shot unless the group has a minimum of 6 hours to play it. I knew that playing for that long wouldn’t be plausible for my group. If I wanted to run it, I’d have to do so in 4 hours or less.
Here we are a year later, around the time some of you might be thinking about your own Halloween one-shots and could be considering Death House. I’m here to tell you that you can run Death House in 4 hours (or thereabouts)! When my game ended we only had a few seconds left on the clock, but we did it. More than that, the goal was achieved in spite of the fact I didn’t just cut content, I also added new material! These additions focused on making the adventure a better one-shot experience. For instance, I added a lot more spooky happenings around the house including a number of haunted traps (mostly taken from Van Richten’s Guide to Ravenloft, which you will need access to if you want to include them should you run my version). I also revised the final encounter to make it more of a set piece, adding lair actions to represent the house’s own contributions to the fight! While these changes added time rather than reducing it, the edits I made elsewhere and my approach to running the session more than make up the difference.
I approached the problem of reducing the session time of Death House from several angles:
- This is stating the obvious: I pre-generated the character sheets. To run this adventure in 4 hours we can’t sacrifice one of them building characters!
- Another obvious tip that had a significant impact: I kept my eye on the clock! If you have a clear sense of the time remaining, you can adjust on the fly.
- I planned such adjustments in advance as well as criteria by which I would decide if I needed to enact them. My approach was to add frequent time-based checkpoints to my notes on the dungeon level. If the heroes reached these parts of the adventure with less time left on the clock than I estimated they should, certain non-essential challenges like fights and traps could be skipped.
- I started Death House with the heroes already entering the house, skipping over the initial meeting with Rose and Thorn which would eat up a decent chunk of time if roleplayed in full. I wrote some read-aloud text to provide the necessary context.
- I didn’t allow the option of leaving the house. You should have buy-in to explore the house no matter what anyway, particularly considering this is a one-shot, but there’s no reason to allow even the possibility of leaving. The house is haunted, so it’s not difficult justifying it sealing itself once the heroes are inside.
- I was transparent with my players about whether or not they had explored a room adequately. When the heroes had nothing left to achieve in a room or no remaining ways to uncover something that was left, I simply told the players they ought to move on.
- The biggest factor of all was reducing the size of the Dungeon Level to streamline exploration. I cut a substantial number of the less important rooms and rearranged the ones that remained to fit together in a more condensed map.
What follows are my notes for modifying this adventure! To run Death House in around 4 hours, refer to these notes alongside the adventure text and keep the advice from the above list in mind during the session.

Four Hour Death House: Adventure Modifications
Starting the Adventure
Read the following text aloud.
You stand on the road in front of a tall brick house that has seen better days. It’s doing better than the houses around it: to either side are buildings with boarded up windows and doors. The doors of the Durst House are dark. The rusty gate of the ground floor portico is slightly ajar, and every now and then creaks as the wind rocks it back and forth on its hinges. Oil lamps hang from the portico ceiling by chains. They flank a set of open doors, one of which remains open. Around you thick Mists press inward, and you can barely see more than 30 feet in any direction.
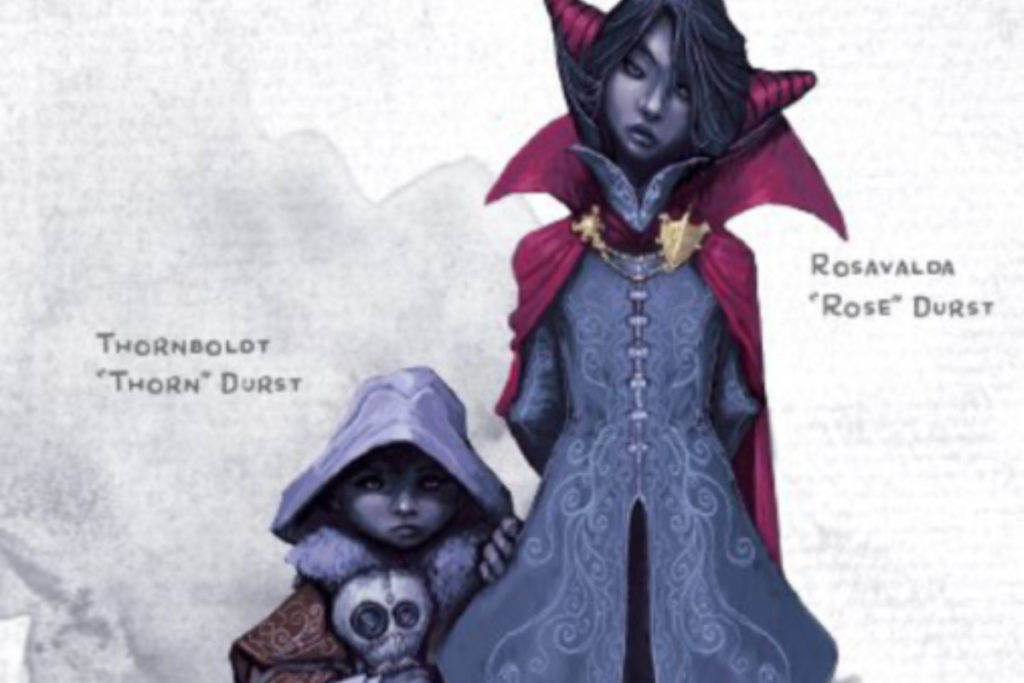
With you are ten-year-old Rose and her seven-year-old brother, Thorn. The boy weeps as he clutches his stuffed doll, while his older sister does her best to comfort him. The two children had caught your attention as you walked through the village of Barovia. When you asked what was wrong, Rose told you that there’s a monster in their house.
You pressed for answers and learned what the children know, which isn’t much. There has been a monster in the basement for some months now, trapped there by the siblings’ parents. They have never seen it but have heard the creature’s terrible howls. Rose and Thorn went out to play, but when they returned their parents didn’t answer their calls. The children were too scared to go into the house in case the monster is free, but they’re scared for their parents and baby Walter who was in the third-floor nursery. Moved by the childrens’ plight, you offered to investigate
Leaving Rose and Thorn to wait safely in the portico and steeling yourselves against whatever you might find within, you pull the wrought-iron gate open with a shriek of its rusted hinges. You step into the pool of lamplight emanating from within and pass through the front door, arriving in a grand foyer. Hanging on the south wall is a shield emblazoned with a coat-of-arms depicting a stylized golden windmill on a red field. The shield is flanked by framed portraits of stony-faced aristocrats. Directly opposite are mahogany framed double doors set with panes of stained glass.

Once the heroes pass through the mahogany doors, they are in Area 2. Main Hall. As long as the doors of the main hall and foyer are open, the heroes can see Rose and Thorn peering in at them from the porch.
The moment all heroes are inside the main hall, however, both sets of doors slam shut. Nothing the heroes do can break through the doors or any of the house’s walls. From the inside, the windows and balcony doors all appear to be bricked up and are therefore treated as walls. Even the mightiest blows only accomplish superficial damage, which fixes itself as the heroes watch. There is only one way out: to break the altar in Area 38. Ritual Chamber.
First Floor
2B. Main Hall Cloakroom
Minor Haunting: Critter Skitters
A hero searching this cloakroom hears skittering sounds in the cavity behind the walls.
3. Den of Wolves
Minor Haunting: Off With the Head
As the last of any heroes to enter this room leaves, there is a sudden loud smash! The mounted stag’s head has fallen from its place above the fire, and the wooden mount has cracked. If anyone looks behind it, they see blood pooling on the floor as it drips from the crack.
4A. Kitchen
Haunted Trap: Dumbwaiter Drop
A haunted trap’s presence can be detected using Detect Evil and Good, Divine Sense, and other class features and spells that can detect the presence of a desecration.
A hero that squeezes in the elevator box notices this trap’s manifestation if their passive Perception is 14 or higher: a sudden sensation of dread. They notice the emanation they have until the start of their next turn to react, such as fleeing or disarming it by spending a Channel Divinity, casting remove curse, or similar.
If the hero is still in the dumbwaiter at the start of its following turn the rope-and-pulley mechanism that controls it suddenly spins, moving the dumbwaiter up (or if necessary, down) and trapping the elevator box between floors. A hero inside the elevator must make a DC 14 Wisdom saving throw. On a failed save it becomes convinced that there is nothing but a massive drop below the box… and they can hear *something* above them, gnawing at the rope. While they panic, they are stunned. A creature outside of the dumbwaiter shaft can make a DC 19 Strength (Athletics) check to fight against the supernatural forces holding the controls in place. Another creature can take the Help action. On a success, the elevator box is returned to their floor and the haunting ends. On a failure, the elevator box drops to the kitchen on the first floor at the beginning of the victim’s next turn. If the creature inside isn’t panicking, of it is resistant, it takes bludgeoning damage according to which floor the elevator box was on before the fall: 1d6 bludgeoning damage if already on the ground floor, 2d6 if it was on the second floor, or 3d6 if it was on the third floor. If the creature is panicking it is convinced it falls further and instead takes 6d6 psychic damage. If the hero is immune to psychic damage, it instead takes the same bludgeoning damage as it would if it weren’t panicking.
5. Dining Room
Minor Haunting: Alpine Chill
The dining room feels unnaturally cold, and heroes who remain here long in light dress begin to shiver. Anyone who stands next to the fireplace can feel a chill breeze emanating from the painting of an alpine valley above the fire. Destroying the painting ends this effect.
Second Floor
6. Upper Hall
Minor Haunting: The Family
The painted people in the portrait seem to have a life of their own… but only when no one is watching. The hero with the highest passive Perception feels Gustav’s gaze following them around the room. A hero who studies the painting turns away from it for a second and then looks back to find Elisabeth scowling directly at them.
Minor Haunting: The Secret Life of the Library
A hero that approaches the door to Area 8. Library hears rustling as though many papers were fluttering. There is nothing in the library to make this sound except the books, but the books are still. The sound picks up again after the last hero leaves the library.
7. Servants’ Room
Haunted Trap: Dumbwaiter Drop
This haunted trap is described above, in the notes for Area 4. Kitchen and Pantry.
8. Library
Minor Haunting: It’s Behind You
A randomly determined hero in this room feels as though someone is behind them, so close they can feel the breathing on their neck. If no hero has found the secret door, you can have this happen to someone standing near the door, suggesting it happened as they stood with their back to the bookshelves. If they investigate this area thoroughly, they can find the secret door with no check needed.
9. Secret Room
Minor Haunting: Chatterbox
When the letter is taken from the skeleton’s hand, its jaw suddenly chatters like a set of joke teeth!
10. Conservatory
Haunted Trap: Danse Macabre
A haunted trap’s presence can be detected using Detect Evil and Good, Divine Sense, and other class features and spells that can detect the presence of a desecration.
This entire room serves as a more powerful variation of the Danse Macabre haunted trap. When a creature enters the area, they must make a DC 14 Perception check. On a success, they hear the trap’s emanation: the sound of distant, mournful music. A round later, two phantom performers appear: one at the harpsichord and the other at the harp. Because their are two performers it is harder to persuade them to stop playing, increasing the DC of the Charisma (Persuasion) check to 19. The haunted trap is otherwise identical to a regular Danse Macabre.
Third Floor
11. Balcony
Haunted Trap: Morbid Memory
A haunted trap’s presence can be detected using Detect Evil and Good, Divine Sense, and other class features and spells that can detect the presence of a desecration.
The area indicated by the pink square is a Morbid Memory haunted trap. When a hero first enters the area after the animated armor is defeated, they—and only they—hear faint, disembodied whispers. If that hero is still in the indicated area at the start of its next turn, the morbid memory plays out:
Read the following text aloud.
Two ghostly figures appear near the door to the east. One is a thin, exhausted looking woman in a plain dress, who looks like she has been weeping. The other also appears to be a woman, but her appearance is hidden by a cloak. The maid speaks, but the heroes don’t hear the words. After a pause in which the cloaked woman gestures as though speaking, the maid starts to look frightened. She speaks again, then notices the cloaked woman pulling a curved dagger from beneath her cloak. The maid becomes desperate and falls back against the door behind her as her attacker slashes again and again. Then two robed and hooded figures appear from the edges of the manifestation, each wielding a dagger of their own. They all continue to plunge their blades into the maid with manic glee until the manifestation ends moments later.
When the vision ends, all creatures in the area that saw the illusion must succeed on a DC 10 Wisdom saving throw or become frightened of the area for the next 1d4 rounds. Frightened creatures must take the Dash action and move away from the haunted area by the safest available route on each of their turns, unless there is nowhere else to move. After the haunted trap is activated, it won’t activate again for 24 hours.
12. Master Suite
Haunted Trap: Faceless Vanity Mirror
A haunted trap’s presence can be detected using Detect Evil and Good, Divine Sense, and other class features and spells that can detect the presence of a desecration.
The vanity mirror is affected by a Faceless Mirror haunted trap.
Haunted Trap: Dumbwaiter Drop
This haunted trap is described above, in the notes for Area 4. Kitchen and Pantry.
13. Bathroom
Minor Haunting: Bloodbath
Contrary to the adventure notes the plumbing works fine, it’s just not carrying water. While one or more heroes are investigating this room they hear a sudden drip from the spigot. The drips continue, slow and steady, as drop by drop the barrel fills with blood.
14. Storage Room
Minor Haunting: Critter Skitters
A hero searching this room after fighting the broom of animated attack hears skittering sounds in the cavity behind the walls.
15. Nursemaid’s Suite
Threat: The Nursemaid’s Ghost
This is one of two locations a specter might be encountered. To make things more interesting, I gave her a reduced threat version of a banshee’s wail.
Wail (1/Day). The nursemaid’s specter releases a mournful wail, provided that she isn’t in sunlight. This wail has no effect on constructs and undead. All other creatures within 30 feet of her that can hear her must make a DC 10 Constitution saving throw. On a failed save, a creature takes 13 (4d6) psychic and is stunned until the end of the specter’s next turn. On a successful save, a creature takes half the damage.
Haunting: The Mirror of Eyes
The first hero who looks into the mirror in this room briefly glimpses a pair of red eyes looking back at them from the face of a figure shrouded in shadow. They must make a DC 12 Intelligence saving throw. On a failed save the hero becomes paranoid, always sensing that something is watching it from nearby. Its constant state of distraction causes disadvantage on its ability checks. This effect is a curse, and can be ended with a Remove Curse spell or by scratching out or destroying all the eyes hidden among the carved berries (finding them all requires a DC 15 Perception check). Otherwise, this curse ends when the heroes leave the house.
After a creature fails its saving throw against the trap, the trap won’t activate again for 24 hours.
Minor Haunting: Walter’s Blanket
When a hero unbundles the blanket in the crib only to find nothing inside, the sound of a baby crying fills the room until every hero leaves, when it goes silent.
17. Spare Bedroom
Minor Haunting: Doll on a Stroll
Nothing happens in this room when the heroes first investigate, but strange happenings occur if they leave the door open when they leave. The next time they reenter Area 16. Attic Hall after exploring a different room they see the doll from the window box has moved and is now standing upright in the doorway. The doll never moves while watched but continues to follow them around the house, moving when their backs are turned, until it is destroyed.
18. Storage Room
The Nursemaid’s Ghost
This is one of two locations a specter might be encountered. I made a change to her stat block (see Area 15. Nursemaid’s Suite).
Attic
20. Children’s Room
Threat: Rose and Thorn
The heroes aren’t really expected to fight these ghosts, but I wanted to make this encounter a little more interesting in the event that it happens. In my version Rose still has a ghost’s Horrifying Visage action, which she is especially likely to use after someone attacks or terrorises Thorn. I gave Thorn the following reaction:
Teary Urchin (reaction, recharge 4-6). Thorn sheds tears of terror in response to being attacked or targeted with a hostile spell or effect. The creature targeting Thorn must make a DC 13 Wisdom saving throw. On a failed save, they can’t target Thorn and their action ends.
Minor Haunting: Action Figures
In the interests of disclosure this minor haunting isn’t my original idea. Unfortunately I can’t remember exactly where I found the original it was based on and haven’t been able to locate the source (I believe it was likely from a reddit post). If you can point me in the right direction let me know so I can edit in the deserved credit!
When/if the heroes look inside the dollhouse, they see small articulated wooden dolls that look exactly like the party members standing in their exact positions within the house. Dolls representing unconscious or dead heroes are likewise in their current positions in the house, but knocked over. The dolls representing heroes that are currently past the secret door to the cellar are nowhere to be seen. The dolls don’t move while being observed but any time a hero checks the dollhouse after the first the doll’s positions have changed to accurately reflect the party’s current locations.
Inside the toy chest are many more wooden dolls dressed in the garb of wizards, warriors, rogues and other heroic figures that might represent other adventurers who were previously lured into the house. Ominously, each one has had its face scratched off.
The dolls in the house and chest are illusory but seem real to the touch until the deception is identified or they are removed from Durst House, when they disappear.
Dungeon Level
First things first: this is the part of the adventure that typically takes the most time, since it’s more of a traditional dungeon crawl. I axed a lot of it, reducing the size of the dungeon level considerably. There’s no doubt that this was the biggest factor in my success running Death House in a single 4-hour session! I removed about half of the areas entirely, since it seemed to me that many of the areas establishing the cult’s headquarters aren’t strictly necessary, especially when there are no living cultists populating them. This reduced version assumes that instead of living below the Durst’s house, members of their cult simply visited to perform their dark rites under the pretense of less sinister social gatherings such as dinner parties and salons. I also condensed Area 23. Family Crypts, which I felt were unnecessarily spread out. The only areas that remain are 22, 23a through 23f, 29, 30, 31, 32, 35, 36, 37, and 38.
The result of all these changes is the edited map below. If you want a better looking version you’ll have to hack together your own using either the official map or one by an alternative catographer (when I ran the adventure I actually used a map edited together from Mike Schey’s official cartography, but since I don’t possess the rights to the original image I can’t share it). You should already have access to Mike Schley’s map if you own a digital version of Curse of Strahd. If you have a physical copy of Curse of Strahd, then you can buy a high-res version directly from the cartographer for a small fee: get it here. There are also other maps for the adventure out there on the internet, both paid and free.
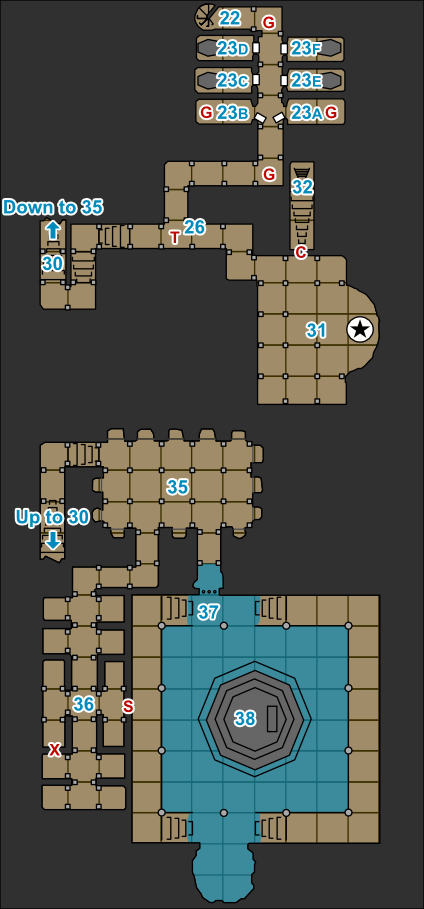
22. Dungeon Level Access
Read the following text aloud.
Cobweb strands cling to you as you proceed down the narrow, spiral staircase. As you reach the bottom, you begin to hear an eerie, incessant chant, The wooden spiral staircase from the attic ends here. A narrow tunnel stretches southward before turning almost immediately west.
23. Family Crypts
Time Check!
If there’s less than 90 minutes remaining in the session, or if the party is already in bad shape, make the following changes:
- There are no ghouls hidden in this area (skip the ghoul encounter described below).
- Add +44 hit points (half the combined hit points of the ghouls) to the maximum hit points of the shambling mound in Area 38. Ritual Chamber.
You probably don’t need to skip the swarm of centipedes in 23d, it isn’t going to last long. Cut it if you feel you need to, or simply have the remains of the swarm flee after 1 round if not already dead.
Crypts
These 6 crypts are now arranged along the corridor immediately after the turn west from Area 22. Dungeon Level Access.
The ghouls previously located in area 29 (which has been removed from the adventure) have been moved to this location. They are buried in the ground at the spaces marked G at either end of the corridor and in crypts 23a and 23b. The ghouls have been there for some time, their existence preserved by the dark magics of Durst House itself. Nevertheless, a hero paying attention to their surroundings as they go may make their choice of a DC 10 Intelligence (Investigation), Wisdom (Perception) or Wisdom (Survival) check to notice that the earth is looser in these locations.
The ghouls wait until more than half the party have passed the corner before striking.
Reward. If both Rose and Thorn’s skeletal remains are laid to rest in their respective coffins, each character who participated or argued in favour of this action receives a charm of heroism: as an action, the hero can give themselves the benefit of a potion of heroism. Once the charm is used, it cannot be used again.
26. Hidden Spiked Pit
Time Check!
If there’s less than 75 minutes remaining in the session, or if the party is already in bad shape, allow them to detect and bypass the trap automatically. Describe the detection of the pit by whomever is scouting ahead or most perceptive in the party.
Location Change
This trap has been moved to a three way intersection between areas 23, 30, and 31. The ghostly chanting heard throughout the dungeon is noticeably louder to the north.
31. Darklord’s Shrine
Time Check!
If there’s less than 75 minutes remaining in the session, or if the party is already in bad shape, make the following changes:
- There are no shadows in this area (skip the fight).
- Add +40 (half the combined hit points of the shadows) to the maximum hit points of the shambling mound in Area 38. Ritual Chamber.
Shadow Encounter
If the heroes are travelling with a light source, the undead shadows here move to where they can hide in the shadows the light will cast: behind the statue, by the chained skeletons, even at the hidden corner by the room’s entrance so they can slip into a hero’s own shadow. This gives them advantage on their Stealth: to see if the heroes spot the shadows, compare their Perception to a DC of 19. Anyone whose passive (or active, if they’re being cautious) Perception equals or exceeds the DC notices that while in this room the shadows cast by both the statue and themselves are moving oddly.
If the statue isn’t disturbed, the shadows won’t attack unless attacked by the heroes first. If someone touches the statue, triggering the room’s Morbid Memory haunted trap, then the shadows attack immediately after.
Strahd’s Statue
Heroes may make a DC 15 Religion check to determine that the statue of Strahd does not represent any god they’ve ever heard of.
Heroes may make a DC 15 Arcana check to sense that the statue does thrum with magical power, and it may not be safe to interfere with it. Casting detect magic also reveals this, as well as the fact the magic of the statue is necromancy.
Due to the psychic energy resonating within it is immune to any spell or effect that would alter its form.
Haunted Trap: Morbid Memory
A haunted trap’s presence can be detected using Detect Evil and Good, Divine Sense, and other class features and spells that can detect the presence of a desecration.
The whole room is a Morbid Memory haunted trap, but the trap is only triggered if someone touches the Strahd statue or removes the crystal from its hand. The morbid memory plays out immediately. Read the following text aloud:
The spectral image of three robed and hooded cultists appear in a semicircle, each on their knees and bowing to the statue in the centre. Each holds forth their hands with an offering: to the left and right, two silver bowls filled with dark blood; the middle cultists hold out a bloody heart cupped in his bare hands. You know with a heavy certainty that neither the organ nor the blood comes from mere livestock.
The three stand, the two to the sides dipping their fingers into their bowls before rising. Holding the heart in his left hand, the middle figure pulls off his hood with the right. His brooding features light up euphorically as the other cultists paint two daubs of blood below his mouth, like fangs. Then, with the same relish as anyone else might eat an apple, he bites into the heart. The manifestation ends.
38. Ritual Chamber
Time Check!
If there’s less than 60 minutes remaining in the session, make the following changes:
- Halve the shambling mound’s hit points: 68 (no bonus hit points), 90 (the ghoul fight was skipped), 88 (the shadow fight was skipped), or 110 (both fights were skipped.
- To keep the shambling mound as a credible boss fight despite its diminished hit points, increase the reach of its attacks to 15 feet. It must still be within 5 feet of a grappled creature to use its Engulf action.
- Consider not using the shocking storm lair action described below, or limiting its use to only once or twice during the encounter. Its ability to heal the shambling mound will prolong the combat.
If you’re very pressed for time (40 minutes or less), don’t give the shambling mound any bonus hit points for skipped fights.
Room Description
When you read the area’s description aloud, instead of shackles at the end of the chains hanging from the ceiling replace them with butcher’s hooks.
Haunted Lair
The Ritual Chamber is the very heart of Durst’s house haunting, and is so seeped with psychic energy that it has its own lair actions. The house uses these actions against heroes while they’re in this area beginning when they fight the shambling mound and continuing until the altar is destroyed, when it can no longer use them. On Initiative count 20 it may use a Lair action to cause one of the following effects:
- Butcher’s Hooks. The hooked chains strike like snakes, elongating impossibly to attack a creature in the chamber. That creature must make a DC 13 Dexterity saving throw. On a failed save the target takes 4d4 piercing damage, is grappled, and pulled above the altar so that its blood can drip down. On the following round, and each subsequent round the target remains grappled, the house’s lair action deals 2d4 additional psychic damage to each target that fails its saving throw in addition to any other effect. This lair action can’t be used if a creature is already grappled by the chains. If the target dies on the butcher’s hooks, the chains automatically fling off their victim’s body.
- Fogged Up. The area fills up with eerie fog. All creatures in the area must make a DC 13 Wisdom saving throw. On a failed save, a creature treats the whole room as heavily obscured (the creature effectively suffers from the blinded condition when trying to see in this area). On a successful save, the creature treats the room as lightly obscured (the creature has disadvantage on Wisdom (Perception) checks that rely on sight in this area). The fog disperses at initiative count 20 on the next round.
- Waterspout. A miniature waterspout forms, filling 5-foot-radius cylinder that reaches from floor to ceiling. Creatures in the water and within 15 feet of the waterspout must make a DC 13 Strength saving throw. On a failed save the creature is pulled into the spout, battered around, and thrown up against the ceiling, taking 2d6 bludgeoning damage. Creatures that move within 15 feet of the waterspout while wading through the water must also save against this effect. The waterspout remains until initiative 20 on the following round, and for the duration all the water in the area counts as difficult terrain.
- Shocking Storm. A miniature storm cloud forms above the shambling mound, and lightning strikes around the monster. It gains 5d4 hit points. If the shambling mound is in the water, stray lightning bolts hit the water and electrical charge spreads through it. Each creature in contact with the water and within 15 feet of the shambling mound must make a DC 13 Constitution saving throw, taking 3d4 lightning damage on a failed save or half damage on a success.
Shambling Mound
The shambling mound has a higher hit point total if certain other fights were skipped for time: 180 (the ghoul fight was skipped), 176 (the shadow fight was skipped), or 220 (both fights were skipped).
Destroying the Altar
Any hero can make a DC 15 Intelligence (Arcana or Religion) check when they inspect the altar. On a success the hero figures out that this room, and more specifically the altar, are the heart of Durst House’s haunting. Destroying it would critically weaken the psychic phenomena at play, immediately stopping the haunted lair actions and also allowing the party to escape from the house.
The altar is made of solid stone. Due to the psychic energy resonating within it is immune to any spell or effect that would alter its form. It has 40 hit points and is immune to poison and psychic attacks. It has vulnerability to thunder damage. Bludgeoning, force, and necrotic damage affect the altar normally, but it has a hardness of 7 against all other damage types: if a single source of damage doesn’t deal at least 7 hit points, the altar is unaffected.
The house continues to take lair actions until the altar is destroyed. It prioritises heroes that are attacking the altar as targets for its lair actions. When the altar breaks the whole basement shudders as a cacophonous psychic scream is released.
Ending the Adventure
There are two possible endings to this adventure (three if you count a TPK!). If the cult is appeased, the ending plays out as normal. If the cult is denied, then the ending can play out as normal if there is time to do so and assuming the party isn’t already in too serious a condition. The sudden attacks of the Death House on the party as they try to leave are its vengeful death throes.
If you’re running short on time, the breaking of the altar immediately ends the haunting. Simply describe the heroes making their way back up and out of the house through narration. They find that the windows and balcony doors are no longer bricked up, and the main hall and foyer doors are unlocked. They safely return to the street outside.
Whichever of the two endings play out, the apparitions of Rose and Thorn outside the house have disappeared, and the Mists have cleared.
Setting the Scene
If you’re running Death House as a one-shot this Halloween, you’re going to want spooky ambience! Here are a few things I used during my one-shot to improve the player experience:
Spooky Sounds
There are plenty of great options out there to suit your needs: tabletop audio and syrinscape spring to mind, but you could also achieve great results simply through using a well curated playlist. I personally had great success using Syrinscape’s Death House sound set.
When running the game online like I was, it should be possible to feed the audio through to the other people in your video chat though the precise method may require some research and effort. In my case feeding audio through Zoom was simple: I was able to do so by selecting the “share computer audio only” advanced option for the Share Screen feature.
Spooky Maps
There’s nothing wrong with the official map for Death House. It’s perfectly functional as an aid to exploration, but it doesn’t really scream “spooky”. The rooms are plain and the map is bright. If you want something that better evokes the adventure’s ambience you’ll find a number of haunted house maps with suspiciously similar layouts online if you search for them!
Since I was running the game through Roll20, it was a no brainer for me to choose a map from their marketplace. I went with Mikwewa Maps’ “House of Death“, specifically the version with dynamic lighting to save myself some trouble. Note that this map only includes the house, and there’s a separate map called “Death Dungeon” for the dungeon level. Since I planned to edit the dungeon level down considerably I opted not to purchase the Death Dungeon map, but you might wish to.
